New School Year Begins!

Tuesday, August 27, 2013
Brag Tags!

I purchased some of these adorable brag tags from Miss Nelson's teacher store.  She has an amazing blog you definitely need to check out and follow too: "Run! Miss Nelson's Got the Camera."

Anyway, today I introduced my second graders to our Brag Tags.  They are so excited and thrilled to start collecting these!  I told them they could earn them for all kinds of reasons; knowing all of the sight words, perfect attendance, being kind...

I am letting them collect their Brag Tags on a ring which I have displayed on a bulletin board.  At the end of the school year, I am going to let them take all of their Brag Tags home on a 24" chain. 

I took a few pictures of the container I am storing all of the Brag Tags in, some of the Brag Tags I have prepped, and the bulletin board I am displaying them on.  Enjoy, and I hope you use these with your kiddos!  They will LOVE them!  =)

Brag Tags Container...

So adorable!

Our Bulletin Board...


signature

Fraction Names...

Thursday, July 25, 2013
I didn't get to blog about this Math activity, but wanted to share some of the adorable pictures I took.  

First, my 4th graders decorated their name.  Then, they had to write a fraction for how many of their letters were vowels, and one for consonants.  They also simplified their fraction if they could.  It was really fun, and their Fraction Names turned out AMAZING!

I am planning on doing this same activity with my new 2nd graders.  

Here are the pictures from my 4th graders:

I made one...
They were all so colorful!
Love the Monster's teeth! =)

This Ocean one is adorable!


signature

Monday Made Its...

Monday, July 22, 2013


I am finally linking up to Tara's Monday Made It...  


The first idea for my Monday Made It, was from Mr. Smith at teachertipster.com.  His ideas and site are so valuable.  I made the Power Towers using our sight words.  I wrote all of the words on the bottom of the dixie cups, and then decorated an empty Pringles can.  My new second graders will love reading the word and then stacking it on top to build a high tower.  

Sight Words...

Build a tower...
The container to hold the cups...

The next ideas I made were just from using some games, but with a different twist.  I bought a Connect 4 game, and a Memory game from Target, and know I have a Sight Word game and also a Synonym/Antonym game.  

I wrote all of the sight words on colored, circle stickers and stuck them to both sides of the discs.  When kids play the game, they need to read the sight word on their disc before placing it in the grid.  They need to get four in a row to win.


Sight Words...

Connect 4 Sight Word Game...

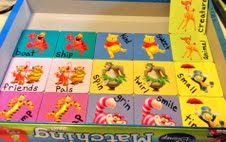
The Memory game I bought had two complete sets. I wrote Synonym pairs on one game, and Antonym pairs on the other.  


I wrote synonyms on each card...


Not a match...

A match...Grin and Smile! =)


Then I cut out the Addition and Subtraction Memory game I printed from a great site called The Teaching Oasis.  Jessica's site is amazing! 

I printed them up, put them on card stock, and laminated them.
Subtraction game...

The containers to keep the cards in...

The final thing I made was a Memory game, or matching game about Antonyms.  I found these cute Ketchup and Mustard cut outs from the Dollar Tree.  I laminated them and wrote Antonyms on them.  My 2nd graders can play a memory game, go fish, or sort and match them up on their own.  

I think they turned out really adorable! =)

Cute!

Not a match...

Found a match!  =)

I have been enjoying summer break so much!  I LOVE seeing all of the fabulous ideas on teacher blogs and Pinterest.  Enjoy your summer!


signature

Ten Frame Beads...

Friday, June 28, 2013
I found this idea on Donna's blog called "Math Coach's Corner," and I just finished making 25 of them for my 2nd graders next year.  Yes, you heard me correctly, 2nd graders!  I am moving from 4th grade to 2nd grade next school year, and I am so excited!!!  I LOVED 4th grade, but I am looking forward to my new little 2nd graders.  

Anyway, here are the pictures and steps on how to make your own set of "Rekenrek" calculation racks.  I would love to hear any suggestions for a cutesy name for these little beaded boards.  So please leave me comments!

First, I bought some foam sheets from Michaels, and cut them down to 4" by 6".  

Foam Sheets...
 I used a pencil and a ruler to measure a rectangle that is about 1" away from the outside edges, and the two lines are about 1 1/2" away from each other.  

4 pencil dots in the corners, for the chenille stems to pass through.

Then I cut about 1 1/2" off of the end of black chenille stems.  I just poked them through the dots on the end, and bent them over about 2" worth. 

You will need 2 chenille stems per board...
Thread the stem through, and bend it down on the back side of the foam board.
Then I put on 5 red beads, and 5 yellow beads, to make ten beads total.  I used red and yellow beads, because I have those manipulative chips that are two sided, red and yellow; and I think when we use both for adding and subtracting, my students will recognize the colors when making fives, and tens.  =)

Thread the beads onto the chenille stems.
After you have the 10 beads on the stem, poke it through the dot on the other side. 

Poke the stem through the other dot, and bend it down on the back side of the foam. 

Finally, I twisted the two ends of the stems together and wrapped them around, so no ends would stick up.

Twist them together...and

wrap them around each other, so they don't stick up.

 Of course, I had to make them cute, so I added some ocean stickers to go with my beach theme in my classroom.  

Cute stickers...
 
I can't wait to use these in my class.  It is a great idea for adding and subtracting, and for kids to be able to slide the beads and manipulate them as they make groups of five, ten, etc...  

Class set...  =)

Have fun making your own set.  Please leave me a comment about a cute name that I could refer to these little "Rekenrek" boards.  The more I say the Dutch Mathematician who designed this idea, the more I like how it sounds, and my 2nd graders might actually like calling them by his name.  =)  


signature

Balloon Count Down

Count down to Summer Vacation!

Normally I don't do a count down for the last day of school before vacation, but when I saw this idea on Pinterest which came from Jackie's blog called "Here We Go Loopty Loo", I knew I had to try it with my 4th graders.  

First, I typed up some fun notes to put inside the count down balloons.  Each day I picked one student to POP our balloon to see what activity we were going to do, or what little treat they might get.  My 4th graders LOVED this!!!  Everyday, they were begging to be the one to POP the balloon, and they even wanted to keep the little note that was inside.  =)  

Here are some of the pictures of the notes I came up with, and some pictures of our count down balloons.  

All the balloons hanging in our windows.
9 Days Left...
8 Days Left...
7 Days Left... This was a great review lesson on Median, Mode, and Range.
6 Days Left...
5 Days Left...
4 Days Left...
3 Days Left...  check out my post about our Camping Day here.
2 Days Left...
Last Day Balloon...
I have been on vacation for a week, and I already miss seeing my kiddos!  Hope they are enjoying their summer.  =)


signature

Room 12 Went Camping...

Thursday, June 20, 2013

Camping Day!!!


I got the Camping idea from Tara on her fabulous blog called 4th Grade Frolics.

First, we brainstormed all of the words we could think of to describe Camping.  I created an anchor chart web to display their ideas.  Then, I gave them the paper that they were going to use to write about their Camping Adventure.  When they finished writing they could illustrate it.  


Now it was time for the fun part, which I learned from Tara's blog...the cute little glow stick lanyards.  I broke one, and it glowed so brightly.  They LOVED using these as they wrote about Camping.  My class room has a lot of windows, but we made it as dark as we could, and the little glow sticks were a big hit.  


I wanted to make it feel like a real camping day, so I also played some ambient sounds of a campfire crackling owls hooting, crickets chirping, etc...  They were so quite!  After they had been writing for a while, I decided to make them a little treat too...S'mores!  So our campfire lights were not hot enough to roast the marshmallows, but I put them in the microwave for 20 seconds, and they turned out all yummy and gooey!  My kids wanted a second one!  =)  


Camping Day was a huge success.  
Enjoy the pictures.  


All ready for some camping fun...

34 Glow stick lanyards...

Writing...


So much fun!  =)

More writing...


signature
If you find something you like, please give credit to "fabulousfinchfacts." Thank you!. Powered by Blogger.
Back to Top